|

Portraits to go with JTL's Mobilight 300 : Page 1 of 1
Joe Farace March, 2005
The JTL Versalight D Digital Monolights : Page 1 of 1
Jay Abend April, 2004
JTL Web Lite Kit : Page 1 of 1
Bob Shell April, 2003
JTL Mobilights : Page 1 of 1
Bob Shell January, 2003
Two New JTL Light Meters : Page 1 of 1
Bob Shell December, 2002
JTL Superlights Are Hot : Page 1 of 1
Robert E. Mayer March, 2001
JTL Studio Flash And Accessories : Page
1 of 1
Bob Shell November, 2000

Portraits To Go With JTL's Mobilite 300
Wireless Triggering For The Location Photographer
Joe Farace, March, 2005

| |
|
|
|
|
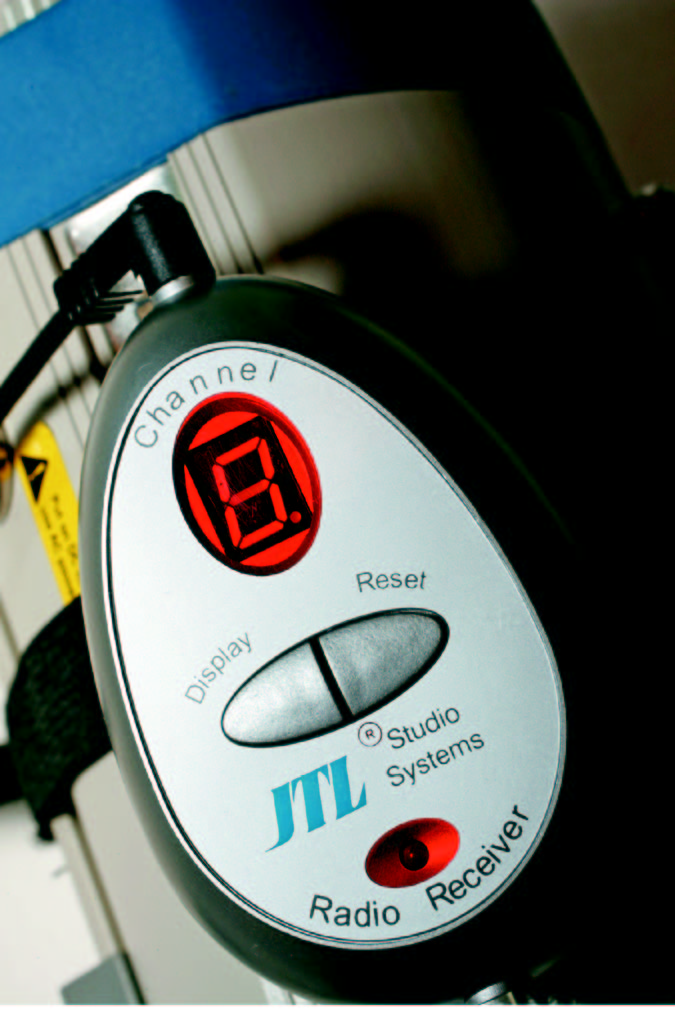
(Above, middle): Unlike infrared strobe triggers, DigiFirer
can shoot through walls and around corners and is useful
up to 120 ft. With eight different channels available for
up to eight different lights or "groups" of lights, it won't
interfere with other lights in your studio-as long as they
are on "different" channels.
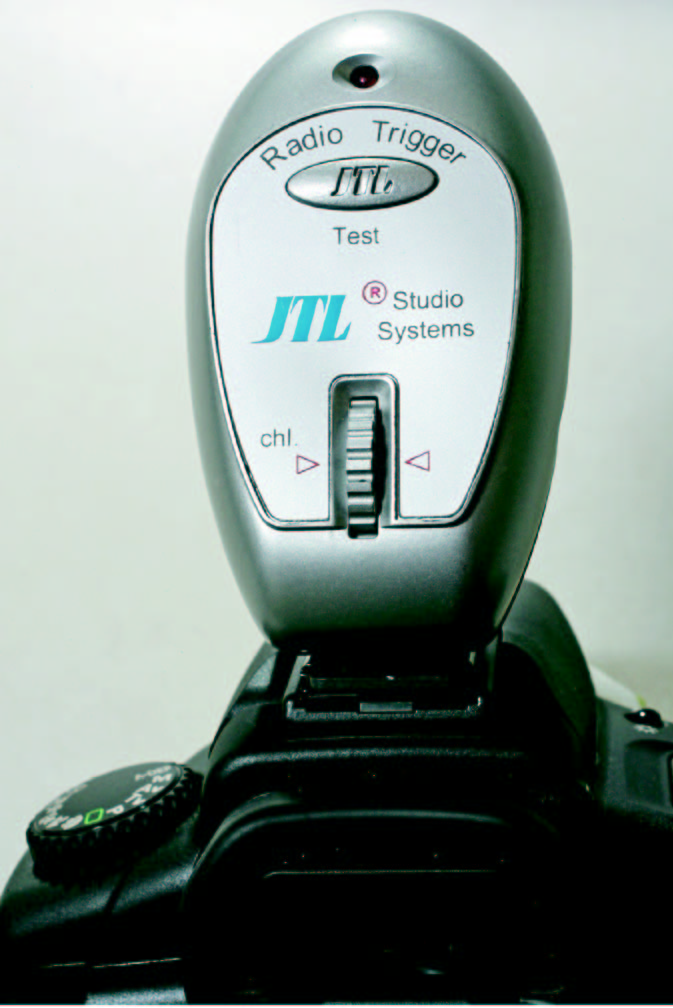
(Above, bottom): JTL's DigiFirer system consists of a Radio
Trigger (transmitter) and Radio Receiver that can be used
for all kinds of lighting equipment. Similar devices from
other manufacturers combine the receiver and
transmitter into "one" unit, but JTL's DigiFirer has two.
Here the Radio Trigger is mounted (correctly) on the hot
shoe of a Canon EOS 20D. A PC connection and cord are
provided, too.
|
|
Riddle me this: What's the hardest
thing to find on any location shoot?
If you said, "clients who were on
time," that would be partially true, but the
correct answer is-an AC power outlet.
They're even more difficult to find if you're
at the beach, in a park, or as I often find
myself, on a racetrack somewhere. One of
the niftiest solutions I've found for
on-location portraiture is JTL's Mobilights.
On The Road Again
The Mobilight is the battery-powered
version of JTL's Versalight monolight. The
Mobilight series consists of three models,
including the 110, 200, and 300, whose
numbers correspond to each model's
output power in watt seconds (ws). JTL's
rechargeable battery pack powers the
Mobilight 110 for more than 180
full-power flashes, the Mobilight 200 for
150 full-power flashes, and the Mobilight
300 for 100 full-power flashes. The 200
and 300 models also have a standard AC
connection so you can power it with one
of those elusive AC outlets. The Mobilight
can be used as a main light, fill light,
hairlight, or backlight on a variety of
photo locations with or without the
battery pack.
All of the Mobilights feature a dual
voltage power inlet, continuous power
setting adjuster, car accessory (we used to
call them cigarette lighter) adapter, and
low battery alarm. (See the accompanying
specifications for what features match up
with which model.) A variety of accessories
are available, including an 18x18 light
bank, four-leaf barn doors, honeycomb,
color filters, and a snoot.
The JTL battery pack requires an initial
charge of 14 hours before using, so start
charging it as soon as you unpack the box.
To charge, connect the AC power cord and
turn the three-position (Bat-Off-Car) to
Off. OK, I agree, that's not too intuitive
but when the battery is set to On or Car, a
green LED lights, but when it's charging a
red LED glows until fully charged. Then,
the light changes to green to indicate a
full charge.
Inquiring minds want to know if they
can mix and match the JTL gear with other
battery packs, such as the Quantum Turbo
2x2. The first thing I did was plug the power
cord from a Turbo 2x2 into the Mobilight
300. Bingo! All cords fit and power flowed.
That also means JTL's power pack can power
my Photogenic StudioMax II monolight.
Wireless, Too
If you've been reading any of my recent
lighting tests you already know I hate PC
cords and love wireless control, mainly
because it eliminates the hassle and tangle
of cords. JTL's DigiFirer is a radio-controlled
trigger system for use in the studio or on
location. The Radio Trigger (transmitter) and
Radio Receiver work with all kinds of studio
lighting equipment, from monolights to
separate power pack and head units. Similar
devices from other manufacturers combine
receiver and transmitter into one device, but
JTL's DigiFirer are separate units, resulting in
a kit price (for both Radio Trigger and Radio
Receiver) of less than $200 instead of the
$300-$400 for competing units. With a price
tag of around $100, you can purchase many
different Radio Receivers-one for all of your
flash units.
Unlike infrared strobe trippers, DigiFirer
can shoot through walls and around corners
and works up to 120 ft, which was a big help
when shooting portraits outdoors with a
300mm lens. Indoors, with eight different
channels available for up to eight different
lights or groups of lights, you won't interfere
with any other lights in your studio as long
as they are on different channels.
The DigiFirer trips the lights in 1/1500
sec. Putting that in perspective, your camera
requires a shutter speed of 1/2000 sec to
freeze a hummingbird's wings in flight. Two
of the less than ubiquitous AAA batteries
should power the Radio Receiver for up to
20,000 triggers, but the ultimate number
depends on environmental considerations, as
I discovered.
In The Field
Unlike many lighting products I've
tested, you can actually take the Mobilight
into a field-any field. The Mobilight 300,
DigiFirer Radio Trigger and Radio Receiver
have a "build quality" that far exceeds what
you might expect from their affordable
price. Fit and finish is to a high standard as
befits more expensive lighting units. Light
stand mounting and adjustment fixtures are
rugged and intuitive to use. A slot,
complete with locking knob, is provided for
umbrellas or the F.J. Westcott
(www.fjwestcott.com) Apollo and Halo light
banks I used during testing.
Controls work in a logical fashion. The
Mobilight's big, round variable power output
knob has click stops, which was a big help to
me because of the way I work. After taking a
meter reading, I use a flash unit's variable
power controls to change exposure rather
than adjusting anything on the camera. This
ensures that my chosen depth of field and
balance between flash and ambient light
remain the same. Having click stops on the
Mobilight 300's power control makes it easy
to increase or decrease exposure by one or
two "clicks" to hone in on my preferred
exposure, which these days I determine by
looking at the histogram on my digital SLR.
Other controls include modeling light and
built-in slave on-off buttons and an
illuminated ready light that also functions as a
flash test button.
Because of these lights' solid heft, you're gonna need a real light stand, not that cheapie,
spindly thing you bought at Crazy Charlie's Flea
Market. I use the 9-foot Manfrotto
(www.bogenimaging.us) model 3333 and it fits
the Mobilight 300 like a glove, although JTL
manufactures some nice light stands at
attractive prices.
Attaching the DigiFirer Radio Receiver is a
snap using the elastic strap that hugs the
Mobilight like a toddler on his first day of
preschool clinging to his Mommy. Two tips on
making sure that the DigiFirer works the way it
should: 1) Make sure you put the Radio Trigger
on the camera's hot shoe so that the controls
face you. If not, the unit may not make full
contact with the hot shoe's electrical contact. 2) Use new batteries. JTL includes batteries for
both units, but if they are not fresh, the system
may trip intermittently. I installed a pair of
brand-new Energizer lithiums in the Radio
Receiver and it worked like a champ. These
batteries are a good choice for cold weather
use, such as when shooting outdoors in
Colorado during November.
Whether shooting indoors or out under all
kinds of wired and wireless conditions, the JTL
Mobilight is a great package for the location
photographer on a budget. While you might
consider the battery pack and DigiFirer wireless
trigger to be accessories, their purchase prices
make them a no-brainer; they are must-have
options for on-location portraits.
|
|
|
|
| |
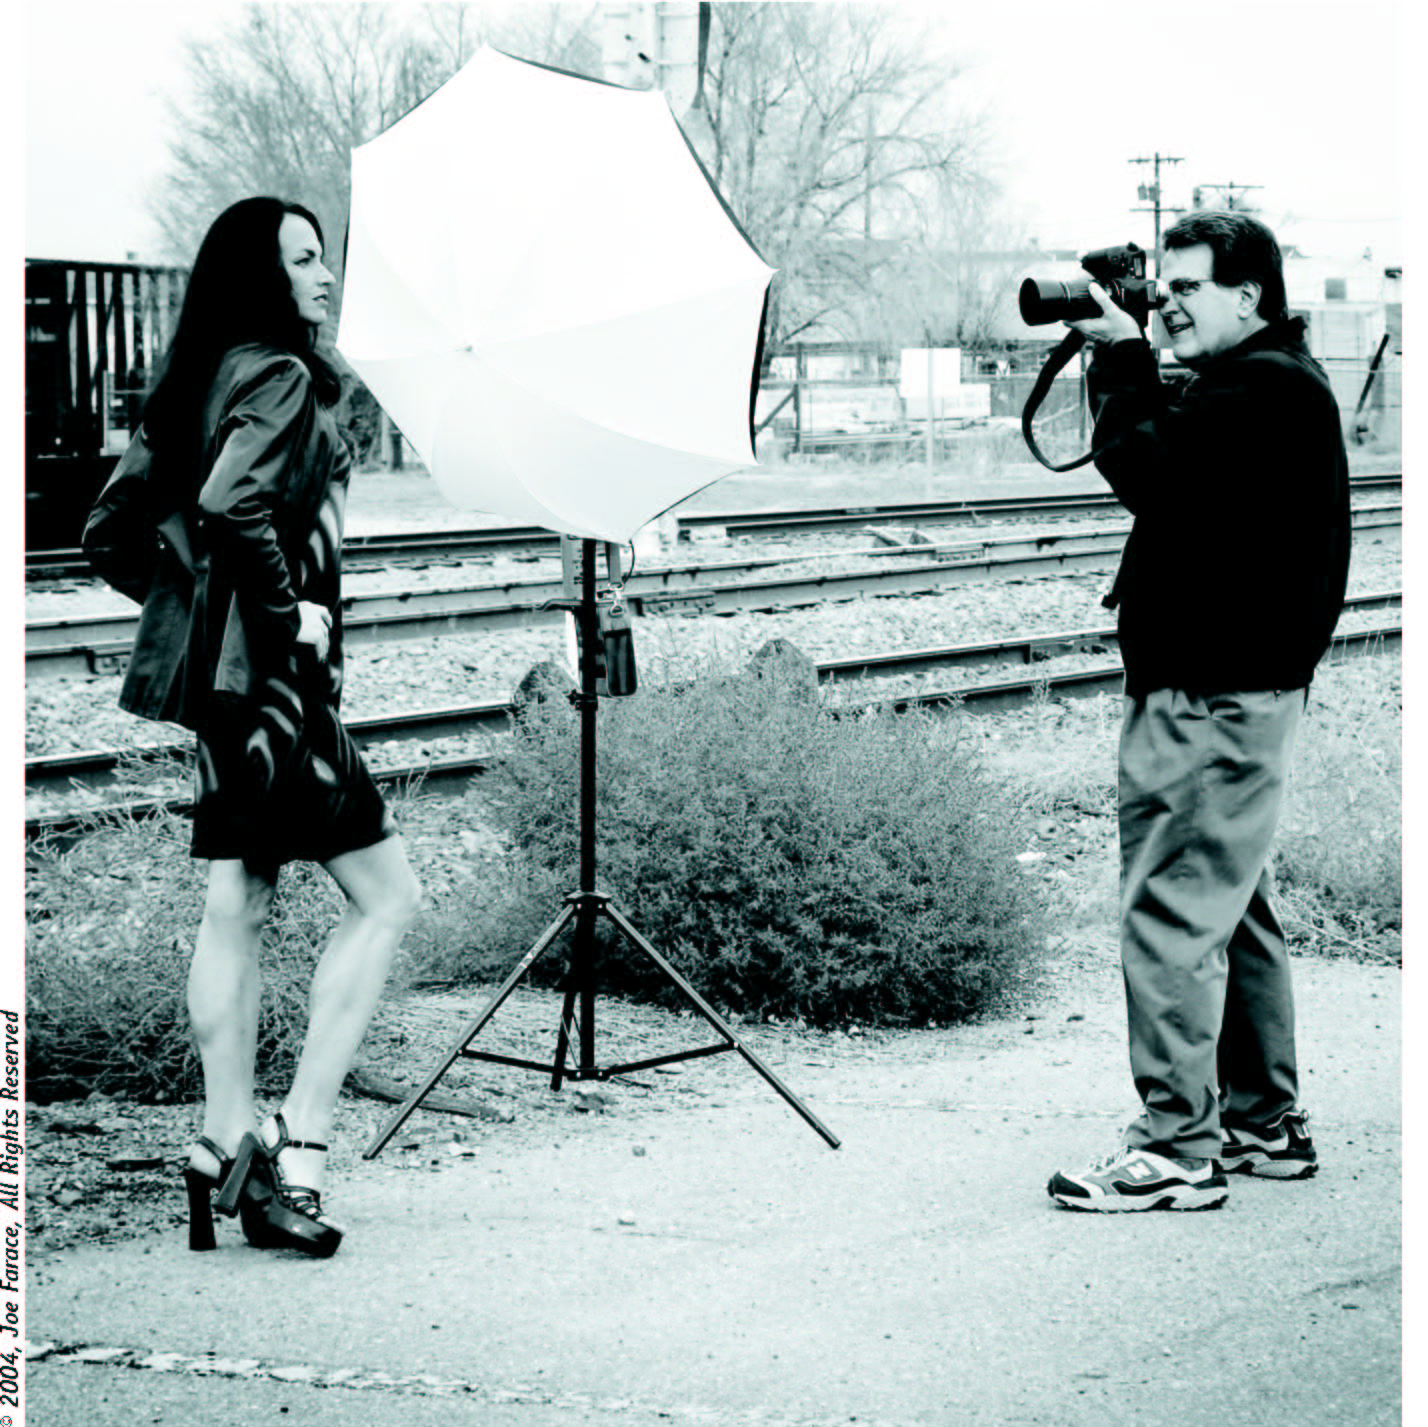
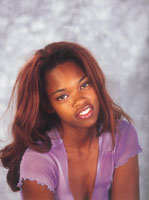
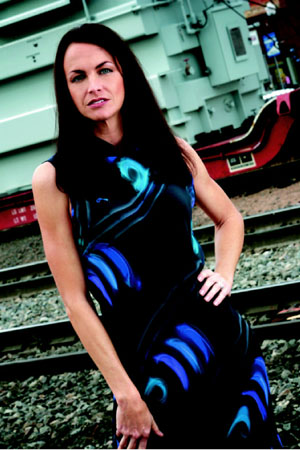
(Above): As Snoopy once wrote, "it was a dark and stormy day," and while the rain hadn't
started yet, it was cold and dreary with absolutely no light to make any kind of
decent-looking on-location portrait. I was able to make this portrait of model Ashley Rae
armed only with a trusty JTL Mobilight 300, battery pack, and F.J. Westcott Halo light bank.
Camera was a Canon EOS-1D Mark II with EF 100-300mm zoom lens. Exposure was 1/80 sec at
f/18 in Manual mode at ISO 200. File captured recorded as a Large JPEG.
Photos
©2004, Joe Farace, All Rights Reserved
|
|
|
|
|
|
 |
|
|
|
| (Above): Changing the
lighting by moving the JTL Mobilight to the other side-camera
right this time-and shooting at only 1/2 power, I was able to
make 3/4 and full-length shots of Ashley Rae. When using the
Canon EF 100-300mm zoom, especially at 300mm, the advantage
of using DigiFirer became obvious. There were no long cords
to cause mayhem and the wireless trigger system worked flawlessly-as
long as the Radio Receiver had fresh batteries. Photos
©2004,
Joe Farace, All Rights Reserved |
|
|
|
|
|
|
|
JTL DigiFirer Wireless Flash Triggering System
|
| |
Radio Trigger |
Radio Receiver |
|
Power Supply |
1.5v (button battery included) |
1.5v (2-AAA batteries included) |
|
Sync Speed |
1/500 sec |
1/500 sec |
|
Range |
120 ft |
120ft |
|
Radio Channels Available |
8 (0-7) |
8 (0-7) |
|
Trigger/Receiving Indicator |
LED |
LED |
|
Channel Display |
(Unmarked) Channel Wheel |
Digital Display |
|
Dimensions |
1.75x3.25x1.5" |
3.5x2.25x1.25" |
|
Weight |
0.8oz |
1.5oz |
|
Price (Per Set) |
Less than $200 |
|
| |
|
 |
|
JTL Mobilight Monolights |
| |
Monolight 110 |
Monolight 200 |
Monolight 300 |
| Maximum Power Output |
110WS |
200WS |
300WS |
| Power Supply |
DC Battery Pack |
DC Battery Pack |
DC Battery Pack |
| AC
110-130v/60Hz and 220-240/50Hz
(multi-voltage) |
| Color Temperature |
5600K |
5600K |
5600K |
| Flash Tube Life |
8000 cycles |
15,000 cycles |
15,000 cycles |
| Sync |
Slave, sync cord, test |
Slave, sync cord, test |
Slave, sync cord, test |
| Built-in Slave |
up to 30 ft |
up to 30 ft |
up to 30 ft |
| Flash Duration |
1/600-1/1000 sec |
1/600-1/1000 sec |
1/600-1/1000 sec |
| Recycle Times |
1.5-3 seconds |
2-4 seconds |
2-4 seconds |
| Modeling Lamp |
No |
150W-110V AC
10W-5V DC |
150W-110V AC
10W-5V DC |
| Modeling Lamp Base |
No |
E27/screw |
E27/screw |
| Power Settings |
1/2, Full |
1/8 - Full Continuous |
1/8 - Full Continuous |
Guide Number
(ISO 100) |
105 |
180 |
200 |
| Dimensions |
5.11x3.93x7.09" |
5.11x4.96x8.26" |
5.11x4.96x8.26" |
| Weight |
21 oz |
3.3 lbs |
3.8 lbs |
| Built-in Slave |
Yes |
Yes |
Yes |
| |
Flashing capacity
(when
fully charged) |
180 flashes |
150 flashes |
120 flashes |
Cigarette Lighter
Adapter |
Included |
Included |
Included |
| Dimensions |
8.26x5.11x2.95" |
8.26x5.11x2.95" |
8.26x5.11x2.95" |
| Weight |
2 lbs |
3 lbs |
4 lbs |
| Price |
$159 |
$199 |
$239 |
|
Before I take any lighting
equipment out on location, I
check it out in the "bat
cave" a.k.a. my basement.
This test shot of my wife
Mary turned out so well I
wanted to share it with all
of you. The image was
captured using her camera,
an Olympus E-1, in Manual
mode at 1/60 sec and f/9 at
an ISO of 200. Lens was a
14-54mm Zuiko Digital at
54mm. Lighting was from a
JTL Mobilight 300, running
on battery power, with a
28" F.J. Westcott Apollo
light bank mounted. A 30"
F.J. Westcott Illuminator
gold/white reflector was
placed at camera right to fill
any shadows. Photos
©2004, Joe Farace, All Rights Reserved
|
|
|
|
|
| |
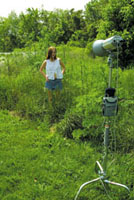
A parking lot may not be the most glamorous location for a photo shoot, but it sure provides some
interesting backgrounds. Not surprisingly, there are "no" AC outlets to plug in a monolight. Here's
where the JTL Mobilight and power pack come into their own. You can't see the Mobilight in this shot
because it's been swallowed by a F.J. Westcott Halo light bank, but perched on top of the light is
JTL's DigiFirer Radio Receiver. My Canon EOS-1D Mark II has a Radio Trigger mounted in its hot shoe.
(Read the text to learn the correct way to insert it.)
|
|
|
|
The JTL Versalight D Digital Monolights
Power, Control, And versatility Priced Right
Jay Abend, April, 2004
“Digital"
is a word that has been thrown about a lot recently.
MP3 players have given rise to “digital headphones,"
drugstore minilabs offer “digital prints," and now
we're beginning to see the popularization of “digital
lighting."
Light, of course, is a purely analog thing. The creation
and modification of light, however, is often controlled
by digital circuitry. While this kind of “total control"
interface has been available on pro-oriented studio
strobe lighting packs for over a decade, the combination
of super high price and “why do I need this" functionality
has hampered their popularity.
That's not to say that digital control of studio lighting
is a bad thing. In fact, the ability to set each of
your lights to an exact watt-second rating, and have
some finite measure of control, can be a tremendous
tool in a busy commercial or portrait studio. Of course
writing down your settings on the back of envelopes
and on pieces of gray duct tape isn't exactly the most
high-tech solution, so creating a way to store those
digital settings makes a digital strobe unit that much
more useful.
As appealing as the digital, computer controlled pack
and head systems seem, I've often had a hard time justifying
the multi-thousand dollar price tags. In the past few
years I've seen some really enticing monolight setups
that include digitally controlled monolight units, wireless
TV-remote style control units, and even completely wireless
PC control of all the lighting units set up in the studio.
The monolights prove to be a far more cost-effective
setup, though many of the European-designed setups will
be in the $4000-$6000 range for a rig consisting of
four light heads and the necessary control hardware
and software. While that may be a lot less than the
$10,000+ of a high-end pack and head digital setup,
it's still a decent investment.
|
| |
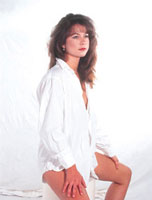
I took
to using the JTL lights, softboxes,
and light stands with no problem. Pro
model Bonnie Griffin never looked lovelier,
lit by a pair of JTL softboxes.
Photos © 2003, Jay Abend,
All Rights Reserved
|
|
Pro
Monolight Options
One of the real up-and-coming companies in the lighting
world is the California-based JTL Corporation. When they
started out roughly 10 years ago, JTL offered the typical
Chinese-sourced, low-end AC-powered slave strobe units,
very similar to those offered by a half dozen other companies.
While the other Asian strobe companies have devoted much
of their attention to the low to medium end of the lighting
business, JTL has gone after the prosumer and professional
market with a vengeance. At a recent photo trade show
I noticed that JTL was now offering a very pro-looking
monolight system with complete computer-based digital
control of all lighting units. It looked “pro" enough,
so I thought I'd give it a try.
JTL arranged for me to try out their new Versalight “D"
series lights for several weeks in my own commercial studio.
I asked for a decent cross-section of the Versalight “D"
line, which is offered in power ratings from 300 actual
watt seconds all the way up to 1000 ws.
Build
And Fit
The Versalight “D" series is the same basic design as
JTL's popular Versalight series. As is the custom on
the high-end Euro monolight systems these days, the “D"
series are housed in an aluminum chassis, with polycarbonate
front and rear ends. JTL does the right thing though,
and the reflector-mounting ring is a large piece of cast
metal―not plastic or flimsy aluminum…nice. The Versalights
are large, very solid units with some extremely clever
design features. First of all, the flash tubes are plug-in
user replaceable units, with frosted glass covers. JTL
seems unconcerned with the aggressive “watt-second"
games that some manufacturers play. By including frosted
covers with the units as stock, they should know that
some far lower powered units with no glass shields at
all will pop out similar f/stops.
JTL also offers clear glass units for those more interested
in raw power, but I like the look of the frosted glass.
The units also come stock with beefy frosted 250w halogen
bulbs. Although they have standard U.S.A. Edison bases,
they are double-glass enclosed, so you can handle them
with your fingers without damage. Also included in every
box is a very nice long U.S.A. power cord, a long sync
cord, and a very nice gray powder-coated, multifaceted
7" silver reflector. It's a very robust and professional
package, and certainly surprising given the pricing. An
800 ws unit sells for about $550, roughly half of the
closest digitally-controlled competitor and as much as
$1000 less than some on the market. |
| |
Don't
confuse this software with high-end
offerings from Broncolor and Hensel―this
is basic stuff here. However, everything
you need is here: the light head numbers,
their position, their accessories. You
can adjust “everything" from your
easy chair―strobe output, modeling
lamp output, and even switch a head
to “Idle" to temporarily disable it.
This kind of functionality used to cost
thousands of dollars.
|
|
In The
Studio
Once we had all of the boxes unpacked, it was time to
integrate them into my studio for some paying customer
shoots. One of the big surprises when I checked out the
great AlienBees monolight units last year was the remarkable
value of the accessories. The Bees' Chinese-sourced light
stands, reflectors, and monolights were hundreds of dollars
cheaper than the pro-oriented American and European units
I had been using.
While I do prefer the good stuff for my main units and
certainly for travel, it never hurts to have more light
stands and softboxes than you need. JTL takes it one step
farther by offering copies of nearly every item offered
by Chimera, Photoflex, Manfrotto, and Matthews, made in
China, at fire-sale prices. (Even the huge Matthews cine-style
“Silks"!) Zero points for originality, but a solid “10"
for value.
JTL sent along a couple of very large silver-lined softboxes,
and a pair of egg-crate grids to keep light from spilling
into the lens. These are super quality units at ridiculous
prices. The nice 36" square unit sells for a starling
$69, and the normally pricey egg crate is only $100. Even
better, these softboxes are designed to handle JTL's
hot light series as well, so they're heat-resistant and
feature a pair of touch-fastener flaps to release heat.
A similar unit from a name brand will set you back about
$360, plus another $200 for the egg crate.
Now it was time to put everything together and do some
shooting. Assembling a studio full of this stuff is a
breeze. Each JTL light unit has a small IR receiver unit
that also doubles as a large LED read-out panel. While
the unit itself is a wonderful size―and the way it attaches
to the monolight is brilliant―the fiddly bracket itself
is a bit flimsy, but that's what gaffer tape is for!
I set up a main light with the 32x48" main light bank,
a fill light with the nice 36" square unit, and a backlight
with a 7" reflector with a 40Þ grid spot.
Lighting
Ratios
Once we got the camera out it was time to figure out our
lighting ratios. There are three ways to control these
lights. First of all, you have the very well laid out
back panel with oversized LED read-outs. You can control
the main strobe output in either 1/10 or 1/3 EV steps.
You can have the modeling lamps track the strobe output,
remain on full, or turn off. There's an audible beep
when the strobe is recycled, as well as a full-sized 1/4"
strobe connector. It's the full pro-oriented complement
of controls, and everything feels really sturdy, including
the oversized backlit power switch.
One of the drags of using monolights has always been the
tedious process of setting each light head to the desired
power output, and then doing a lot of walking to tweak
each head as you shoot. The JTL remote control solves
this problem nicely. Once you assign each light head its
own number, you can access each head from anywhere in
the studio, adjust power, and change settings―even set
a head to “idle" to disable its flash output for that
shot. It's one of the really fun things to stand dozens
of feet away from the set, making all of those lights
change from the little TV remote in your hand!
As sexy as the remote is, the real power here is in the
ability to store an infinite number of “Scenes" on your
computer, recalling them instantly. The JTL software is
terribly simple, but totally effective. While the handheld
remote control is pretty directional―you need to aim
accurately to change power levels―the police-car style
red IR transmitter is nearly omnidirectional. I bolted
it to a 6-foot high light stand over near my Windows XP
computer (no Mac version is available), a full 30 ft from
the shooting area, yet all three heads saw the transmitter
and functioned flawlessly. In fact, even when I dumped
the unit on my desk it still worked flawlessly.
Computer
Control
A neat feature of the software is the ability to not only
set your power levels, but to customize each light head
“Block" with its position in the studio, the model of
flash unit and the accessory bolted to the front. For
commercial shooters like me it's very handy to have a
quickly recallable “scene" that includes softboxes,
light stands, position, etc. This system isn't perfect
though, since there is no provision to link photos of
the setup, and you must use the decidedly old-school serial
port on your Windows-based computer. After a few days
of storing scenes and instantly recalling them I can tell
you that it's pretty addictive.
For example, “F8_Product" lets me know that I'm at
f/8 on the tabletop setup, while “F11_Head" is my headshot
setup, of course at f/11. It's pretty neat. The TV remote
and IR transmitter computer package are inexpensively
priced―and an even better deal when you realize that
the IR receivers come free with each head!
Once I had three of these bolted to light stands I began
to appreciate some of the little things. First of all,
the sliding rail clamp system, popularized by White Lightning
monolights, allows you to instantly balance even the heaviest
softboxes on your light stand. The JTL bayonet reflector
mounting system is very smart―it provides a solid fool-proof
engagement of the reflector or speed ring, and then a
solid screw-down lock. Hang a big heavy softbox with no
worries. For the big stuff clamps and springs won't do
it―you need a solid locking system.
|
| |
For
this image I used a 36" square softbox
with an egg-crate grid on the left,
a 32x48" softbox on the right (also
with egg crate), and a D-1000 head with
7" reflector and 10Þ grid spot.
|
|
On Assignment
I used these Versalights for two solid weeks on a number
of assignments. While I found the JTL lights about 200Þ
Kelvin warmer than my Balcar studio strobes they were
consistent from head to head and it's very easy to dial
in a custom white balance. These units look and feel like
big time pro units. The internal cooling fans are dead
quiet and supremely effective. I ran my strobes all day
with softboxes mounted, yet the JTL units stayed cool
to the touch, and even the front surface of the softboxes
stayed cool. The Versalights auto dump power as you go
up and down the ws range, so you'll never get that one
bogus frame as you dial power down and forget to pre-trigger
your strobes. Even the built-in slave eye is on top of
the unit, rather than the back. This makes it easier to
“see" the other monolights―a nice feature. Power should
not be a problem. I typically ran the 1000 ws units dialed
way down, so I'd guess that the 800 ws units would be
plenty for anyone.
I receive a number of queries every week from pros, amateurs,
and hobbyists looking to break into studio photography.
Everyone seems interested in good, inexpensive lighting
equipment. I have to admit that I really, really like
these new JTL units. They combine a well thought-out design,
a rugged and durable build quality, and a remarkable feature
set for a reasonable price. While the non-digital Versalights
offer all of the same lighting features and run roughly
$100 less per unit, the digital controls, included IR
receiver and optional PC link software really make the
“D" series Versalights a tremendous value.
During my several weeks of using the Versalight D's I
made them my main strobes, first for a product catalog
shoot, then for a series of people shoots. They powered
up in the morning, stayed on all day, worked flawlessly,
and remained cool to the touch. While the extraordinarily
low price for units with this feature set may raise a
few eyebrows, in my studio these JTL strobes proved that
they are the real deal.
For more information on the Versalight D series, visit
JTL's website at http://www.jtlcorp.com/. |
JTL Web Lite Kit
All In One Lighting For Web Images Bob Shell, April,
2003
These
days it seems the Internet is everywhere, and
like most people I have gotten so I use e-mail
for the bulk of my daily communications and
find most of my information via web searches.
This new medium has produced a major change
in how people exchange information, and along
with the written word most people also like
to send pictures, or put pictures up on web
sites. Now that digital cameras have come down
in price almost anyone can afford a decent one,
and they do OK on family snapshots and general
picture taking. But many times we all want to
show someone else exactly what some medium or
small sized object looks like. The cameras focus
close enough in most cases, but the main problem
that has always bedeviled such photography remains―good
lighting.
Hardware
Store Non-Solution
Sure, you can drive to your local hardware store
and pick up some clip-on reflectors and light
bulbs and use them to light your subject, but
these will be very harsh, specular lights. Unless
you buy additional controllers you will have
only full output and can only change the quantity
of the light by changing bulbs. Then you have
to figure out a way to support the lights and
make a background and find something to support
the item you want to photograph. You can certainly
do all that and more, but it would eat up a
lot of your time. If you're like me, spare
time is something you never have enough of anyway.
Wouldn't it be a lot easier if rather than
wasting all this time jerry-rigging something
you could just make one purchase and have all
you need at hand?
|
|
JTL's Solution
The people at JTL Corporation realized the need
for a convenient way to photograph small and medium
sized items for web site and e-mail purposes.
Their designers put a lot of thought into this
and put together their Web.lite kit. It addresses
all of the problems you are likely to encounter
in doing photography of small subjects with a
consumer digital camera.
When you open the cardboard shipping carton that
the Web.lite kit comes in you will find a very
nicely made aluminum case with wheels for easy
transportation and a convenient collapsing handle.
The kit weighs about 32 lbs, so almost anyone
can easily lift it, if necessary. I've carried
it around in my car several times and set it up
in different locations just to prove to myself
that it is easily moved and easy and fast to set
up.
Inside the case is a very complete photography
kit, lacking only the camera. First are two JTL
Digi-Lites. These are compact plastic lamp heads
with built-in metal reflectors that accept 250w
tungsten-halogen lamps which produce light of
about 3200K color temperature. Each Digi-Lite
can be switched from full power to half power
or quarter power as required. When specular light
is desired the Digi-Lites can be used alone, but
most of the time you will want a softer, more
diffuse light so that reflections do not destroy
subject detail and shadow detail doesn't get
lost. For those needs the Web.lite kit comes with
two 18x18" softboxes, made of heat-resistant
fabric with metal support rods and a plastic rear
ring. These go together quickly and easily and
attach to the Digi-Lites by just slipping the
mounting ring onto the front and locking in place
by tightening four set screws in the ring. The
kit also includes one set of barn doors for those
times when you want a mix of specular and diffuse
light and want to control where the specular light
falls. These attach just like the softboxes.
|
|
Light And
Background Support
Of course, nice lights are of little use without
something to support them, so two 5-foot aluminum
folding light stands are also included in the
kit. For backgrounds the kit comes with a two-sided
cloth velour background measuring 40x60". This
background fabric is black on one side and Color-Key
green on the other. The green side makes it easy
to drop out the background with any number of
software applications. All you need do in most
cases is just select the green and the object
will be perfectly silhouetted. Of course you can
also supply your own fabric backgrounds in a variety
of colors via a quick visit to a fabric shop.
Support for the background comes from a set of
two more stands and a crossbar. These stands also
extend up to 5 ft, and the crossbar extends to
5 ft. For larger items you can just let the background
extend onto the floor and place the items on it.
You could do this with small items, too, but to
save your back it is better to have a support
table of some sort. Once again JTL comes to the
rescue with a very cleverly designed folding table
that comes in the kit case. One end of it fastens
to the kit case securely and the other end is
held up by a fifth short stand that allows some
adjustment of the table if you don't want it
level. This produces a table strong enough for
most things you would be likely to photograph.
Everything goes back into the carrying case just
as easily as it came out, which I found somewhat
novel after dealing with so many things that don't
want to go back into their original packaging.
There is even enough extra room for you to store
most digital cameras and some other accessories
inside.
Should you feel the need for more lights for more
elaborate lighting setups, you can buy additional
Digi-Lites individually or in another kit that
includes a light stand and a 33" white umbrella.
The Web.lite kit sells for about $300 at JTL dealers.
You can find additional information on their web
site at http://www.jtlcorp.com/.
|
| |
| Photos © 2002, Bob Shell, All Rights
Reserved |
|
 |
A
Few Words About Lighting
Now it may seem that an 18x18" softbox isn't
very big, but there is an important rule of lighting
that you need to understand when using softboxes
and other diffuse light sources. It is simply
that the actual size of the softbox is not what
matters. It is the apparent size of the softbox
from the subject's position that matters. So
an 18x18" softbox can provide light just as soft
as that from a much bigger one, but you just have
to get it in closer to the subject. The closer
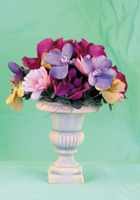
it is, the softer the light will be. For the test
shots of the flower arrangement and camera shown
here I brought the two softboxes in as close as
possible without actually getting them in the
picture.
Generally this is the best way to light small
subjects if you want saturated colors and maximum
subject detail. Some subjects may require a harder
light, particularly if they have no shiny surfaces.
You can experiment with different lighting positions,
different power ratios between the two lights,
and with and without softboxes until you find
what is perfect for your subject. I suggest making
some distance measurements to lights and drawing
simple diagrams so you can duplicate setups that
work for you.
Also remember that you will need to set your digital
camera's white balance to either its tungsten
or 3200K setting, depending on the camera, to
get accurate colors in your images. Some cameras
lack these settings and only offer automatic white
balance. In that case it will not perform well
when using the black or green backgrounds, but
if you have any good image-editing software application
like Photoshop Elements or Photoshop you can easily
fix this. |
JTL Mobilights
Lightweight Studio And Location Lighting Bob
Shell, January, 2003
| |
The
Mobilight flash system is
at much at home outdoors as
in the studio, giving you
the full versatility of a
studio monolight away from
AC power. I used a JTL C Stand
to support the flash head
for this outdoor session.
© 2001, Bob Shell, All
Rights Reserved
|
|
Just
about every photographer who has worked in a studio
has wished that the full lighting system of the
studio could be easily used outdoors. There have
been battery-powered versions of some studio lighting
systems available for some time, but they suffered
from high cost and were generally quite heavy
and not as convenient to operate as their full-fledged
studio flash cousins. I've hoped for years for
a system which would give me the same versatility
outdoors as I have in my studio and would not
break my bank account, or my back.
At this year's photo trade show I made my usual
visit to the JTL lighting booth to see what was
new. Jonathan Zhou of JTL pointed to a battery
pack that was connected to one of their studio
flash heads and told me to pick it up. I reached
down to pick it up and realized immediately that
it must be just a display dummy because it didn't
weigh anything at all. It was like picking up
an empty box.
Zhou assured me that it was not just a dummy but
a fully functional battery pack using a new type
of super light battery that allowed the whole
pack to weigh only about 2 lbs. The flash units
can also be used as regular studio lights with
AC power, or can be powered from a car cigarette
lighter socket. With all of these features, there
was no question at that point that these were
products I just had to try. So I asked JTL to
send me a couple of these new units to try out.
Three Mobilight
Models
There are three Mobilight models, the Mobilight
110 which is very basic and useful for situations
not requiring much light or control, and the Mobilight
200 and 300, which are very full-featured professional
studio type flash units, accepting a wide range
of accessories from JTL. Each Mobilight comes
complete with an AC power cord and can be used
as a regular studio flash by disconnecting the
battery pack and running from AC. The only real
difference between AC and battery pack operation
is that the modeling light does not work when
running from the battery pack as this would run
the batteries down in no time at all. Outdoors
you can check the effect to make sure it is what
you want with Polaroid or digital.
Unfortunately, when the units arrived we were
fully into a summer heat wave here in Virginia
and the heat and humidity made outdoor shooting
unattractive for some time, so I only did a few
short shoots with the new units. Since then we've
had a few breaks in the weather and I have been
able to do some more lengthy shoots and to experiment
with their versatility. I've also worked with
them in my studio, in which case they work just
like regular studio monolights.
|
| |
Even
though the sun was very bright
in the early afternoon, I wanted
to make the shadows on Aubrey's
face less harsh, so I set up
a Mobilight 300 to add fill.
Since I was shooting with a
digital camera it was easy to
see when the balance was right
even though the modeling light
on the flash does not work from
the battery pack. If shooting
on film I could check the effect
with a digital camera or by
shooting Polaroids.
© 2001, Bob Shell,
All Rights Reserved
|
|
Into The
Woods
For the test shoot I took a Mobilight 300 outfit
and an extra charged battery pack out into the woods.
I brought along one of my JTL C Stands to provide
an extra sturdy but lightweight support for the
flash. I was working with Aubrey Goss, a new model
I have made many photos of this year, and wanted
to just do some simple and informal shots to try
out the fill flash possibilities of the Mobilight
300.
It was a terribly hot and humid day and photographer
and model both wilted pretty quickly once we got
out of the air-conditioned Ford Explorer I use for
location work. I had planned to work for a couple
of hours, but after less than an hour we were ready
to call it a day. I hadn't run down the first battery
pack, much less needed the backup.
My camera that time was a Canon EOS D30 with the
Canon 28-80mm L series lens that has long been my
favorite. I really thought the shoot was a complete
bust as we drove back, but it turned out that the
Mobilight had performed much better in the heat
than we had, and I had gotten some images that showed
how well it worked in the field. I expect that I
will be using the Mobilights outdoors a lot now
that the heat wave has come to an end, at least
for this year.
The Model
110
The Mobilight 110 has a plastic housing and is exceptionally
lightweight at 21 oz. It makes an excellent kicker
light, hairlight, product light for small products,
etc. At 110 ws it is powerful enough for serious
photography as well. It has a basic guide number
of 105 and recycles in 1.5-3 sec on its half and
full power settings. You get about 180 full power
flashes from a full battery charge.
Models 200
& 300
The Mobilight 200 and 300 look similar and have
attractive metal housings with all controls on the
flat back panel. They look just like the JTL Versalight
series on which they are based and use all the same
reflectors and accessories. Like the Versalights,
they have a sliding mounting fixture which enables
you to balance the light on the stand regardless
of what sort of accessories you put on the front.
They have four power settings―1/4, 1/2, 3/4, and
full power, for added control. Power level is indicated
by LEDs on the back panel, which are easy to see
from a distance. They have built-in slave sensors
for triggering from other flash units or infrared
triggering systems. Recycle times are from 2-4 sec.
The 200 weighs 3.3 lbs and the 300 weighs 3.8 lbs,
and they offer guide numbers of 180 and 200 respectively.
The battery pack will give you about 150 and 100
full power flashes respectively with these flash
units.
The Mobilight 200 and 300 can be used worldwide
with the battery pack, since their battery charger
is auto-sensing and will work on voltages from 80-240v,
50 or 60Hz. However, powering them directly from
AC requires 110-130v at 60Hz. The battery pack has
a low power indicator which will warn you before
the battery is exhausted and comes housed in a nice
nylon carrying case with both a hanging loop and
touch-fastener straps on the back for attaching
to light stands.
For more information on these and all JTL products,
go to their web site at: http://www.jtlcorp.com/. |
Two New JTL Light Meters
Getting The Right Exposure At An Affordable Price
Bob Shell, December, 2002
|
Getting the
best possible exposure has always been a quest
for serious photographers. If you are shooting
negative films you can sometimes make up for poor
exposure after the fact by compensating in printing,
but the best prints always come from properly
exposed negatives. If you are shooting slide film
you really have no choice but to get the exposure
right, since these films have very little exposure
latitude. And even with digital cameras it is
important to get the correct exposure to prevent
highlights from being blown out, something which
cannot be corrected. This makes good metering
vital to good photography, but in camera meters
are not ideal because they can be fooled so easily
by subject reflectance. Even the most sophisticated
in camera meters are not right 100 percent of
the time, and the problem is that you won't know
when the camera could not meter properly until
after you have taken the photo and had the film
processed. No matter what camera I am using or
how good its meter may be, I always carry a hand
meter to confirm exposure.
Incident
Accuracy
As I have said many times in print and in my lectures
on metering, I feel that the best kind of light
meter is a good incident meter. I've used incident
meters since the 1970s and you just can't beat
one for reliable, accurate exposures in most lighting
situations. While there are many good incident
meters on the market today, good ones can be costly,
so I was very excited when the people at JTL showed
me a couple of new ones at PMA which looked great
and were priced remarkably reasonable. I've now
had a chance to work with both of them. The two
meters are models JTL LM-6 and JTL LM-8, and are
similar in overall appearance and operation, but
with some important differences in features. Both
read flash and ambient light.
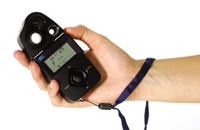
The LM-6
The LM-6 is the less expensive of the two with
an expected street price of around $170. As you
can see from the photo it is a very clean design
with simple controls. On the right side is a sliding
on/off switch. All other settings are controlled
by the innovative four-way rocker switch on the
front of the meter and the button in the middle
of the switch. The left side of the rocker switch,
marked mode, lets you cycle through the meter's
modes, which are ambient, flash, flash with PC
connection, and cine. The chosen mode is indicated
by a small icon along the bottom of the large
LCD panel on the meter. The right side of the
rocker switch lets you set the ISO by holding
it down until the display changes to ISO and using
the upper and lower parts of the rocker switch
to select the ISO. Once selected it is locked
in by depressing the right side of the rocker
switch until the display switches back to metering
mode. The ISO range is from 3 to 8000, certainly
adequate for most photographers.
Although primarily an incident meter, you can
also take reflected readings with a 55Þ
angle of view by sliding the incident dome away
from its position over the silicon photo cell.
You can also turn the black collar on the dome
to retract it if you wish to emulate a flat diffuser.
The meter's head swivels through 270Þ for
convenience.
|
|
Making Readings
To make an ambient light reading you just hold
the meter in the proper place, depending on whether
you are taking an incident or reflected reading,
point the head, and press the big button in the
center of the rocker switch. Once you have the
reading you can use the upper and lower portions
of the rocker switch to view other equivalent
shutter speed and aperture combinations. The meter
reads out in full stops and indicates fractional
f/stops on a 10-segment bar code to the right
of the aperture number on the LCD display.
To meter flash, decide first if you want cordless
or PC cord metering and set the correct mode.
For cordless flash metering you must first activate
the meter by pressing the big button. Active status
is indicated by the flashing of the flash mode
symbol on the LCD display. You then position the
meter, aim the head, and pop the flash or have
someone do it for you. For metering using a PC
cord, select the mode indicated by a lightning
bolt and a C and plug the PC cord into the socket
on the bottom of the meter. Pressing the big button
then fires the flash and makes the reading.
Users of old cameras will appreciate that this
meter has shutter speeds of 1/75, 1/80, 1/90,
1/100, 1/200, and 1/400 in addition to the normal
modern shutter speed range from 1 sec to 1/1000
sec for flash, and 30 minutes to 1/8000 sec for
ambient light readings. The meter can also read
out directly in EV numbers from 6 to 25.9 for
those still using the EV system. For movie cameras
you can use frame rates of 8, 12, 16, 18, 24,
25, 32, 64, and 120. To preserve the single CR-2
lithium cell (supplied with the meter) which powers
the meter, there's an automatic shut off if not
used for 10 minutes. The meter's dimensions are
approximately 31/3x43/4x1". It weighs a Scant
3.6 oz. I was particularly impressed that so much
could be packed into such a light package. Put
it around your neck with its lanyard and you will
hardly know it's there. It comes with a pouch
case for protection as well.
In my studio and outdoor tests the JTL LM-6 agreed
with my meters of known accuracy in bright, medium,
and dim light. It also gave me accurate flash
exposures. This is certainly a meter worth considering
if you are looking for a light, inexpensive, and
accurate meter primarily for incident metering
and for occasional reflected metering use.
The LM-8
The JTL LM-8 is the more advanced model, but it
comes at only a slightly higher price of about
$200, complete with lanyard, battery, and genuine
leather pouch case. It has all of the features
of the LM-6, plus adds a number of other very
useful features to the mix. First of all, it makes
reflected metering easier by adding an optical
viewfinder so you can see the area from which
you are taking your meter reading. This would
be very useful if you expected to do a moderate
amount of reflected light metering in addition
to incident metering. The optical viewfinder is
bright and clear. The optical viewfinder adds
a little more than half an inch to the length
of the meter and it weighs only 4 grams more than
the LM-6.
A nice additional feature is that the LM-8 can
store up to four different readings in its memory
and you can recall them if you wish to calculate
exposure based on multiple meter readings. You
could take one highlight reading, one shadow reading,
and two intermediate readings. This would also
allow you to determine the exposure range of a
scene and make sure it is within the latitude
of the film you are using. In the studio the LM-8
can compute exposure from multiple pops of a flash
giving a cumulative exposure for up to nine flashes.
This can be useful when you wish to use a smaller
f/stop and use cumulative flashes to build up
exposure on slower films.
Perhaps the nicest added feature of the LM-8 is
that it offers a backlit LCD display. Above the
on/off switch on the side of the meter is a pale
gray bar, which looks like a decorative touch.
Pressing this bar lights up the display with a
blue-green light for 30 sec. I found this very
useful in my studio when working behind the flash
heads where it tends to be rather dim.
Also, while the LM-6 works as a shutter priority
meter, the LM-8 can be switched from shutter priority
to aperture priority by simply pressing the on/off
switch. This would be very useful if you wanted
to maintain a particular aperture, for example
to control depth of field.
In my testing I found both of these new light
meters worked exceptionally well, giving accurate
and consistent readings time after time. I would
not hesitate to use them for my photography. For
more information and a comparison chart go to
http://www.jtlcorp.com/.
|
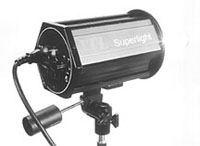
JTL Superlights Are Hot Robert
E. Mayer, March, 2001
| |
| Incandescent hotlights providing continuous
lighting for constant viewing
of the subject with the effects
of the lighting always visible
are particularly popular for
video and motion picture situations
as well as still photography
being done on black and white
or tungsten-balanced color films.
The JTL Superlight is a recently
introduced light of this type
that combines moderate price
along with four versions accepting
long-lived bulbs up to 1000w
in intensity for brighter illumination
when used inside a large softbox
for soft, diffused lighting.
|
|
The incandescent JTL Superlight is a hotlight
fixture intended primarily for working with tungsten-balanced
color films or any black and white film. Although
motion picture and videographers would probably
use this type of light most, still photographers
would also find it helpful in their studios when
they need continuous light falling on the subject
for a constant visualization of the lighting effect.
As nice as electronic flash lighting is, especially
when there is a modeling light, the final balance
of all of the lighting being used is often difficult
to determine. Of course, hotlights can also be
used with daylight-balanced color material when
the proper filter is placed on the camera lens.
Four Versions Offered
This type of light is frequently used inside a
large softbox for soft, diffused lighting, so
it is offered in four versions accepting bulbs
up to 1000w in intensity. The elongated nickel-lined
aluminum metal chassis looks deceptively like
a monolight electronic flash, but it's not. The
design is unlike any I have ever seen before.
The long narrow 1000w quartz bulb protrudes from
the front of the porcelain socket to emit bright
light in all directions. The reflective sides
of typical softboxes direct the light forward
through a diffusion panel onto the subject to
provide soft, wraparound lighting which is very
flattering for glamour poses and female subjects
of all ages, as well as many other types of commercial
objects. Four versions of the JTL Superlight are
offered with the number in the name indicating
the wattage of the bulb. The models are: Superlight
1000; 500; 250; and 150. The bulbs can be interchanged
whenever a different maximum intensity is needed,
but a base adapter is required to change a 1000/500w
unit to accept the smaller base of a 250/150w
bulb. A built-in fan efficiently cools the lamp,
keeping the metal body cool enough to touch even
after it has been burning for many minutes. The
fan cooling is particularly useful when the light
is used inside a softbox when heat build-up often
is a problem.
Light Modifiers
If direct light is desired, a long reflective
neck can be placed over the bulb to completely
enclose and protect it. There is an optional folding
reflector at the front end which looks like a
six-sided barn door. This hexagon turreted reflector
produces typical flood lighting when the leaves
are spread wide open. But, when they are folding
in toward the bulb, the output pattern becomes
similar to that of a focus-adjustable spotlight.
Each reflector leaf has a heat-resistant coating
inside and a non-reflective flat black finish
outside.
The JTL Superlight comes complete with a carrying
case having a handle and shoulder strap plus a
three-way tilt, swivel, and turn device which
is easily loosened with one knob for different
adjustment modes somewhat similar to the type
of control unit found on most tripod tilt-tops.
Sturdy, Yet Lightweight
It appears to be sturdily constructed for years
of use yet is lightweight for portability. All
of the operating controls are conveniently positioned
on the rear of the cylinder. There is a power
cord socket, two rocker on/off switches (with
an indicator light directly above each), plus
a continuously variable rotary switch to adjust
the power level and light output from full down
to off. The left switch is the primary power switch
while the right one turns the built-in fan on
or off.
Once the power is on, the rotary switch must
be turned clockwise to turn on the bulb. As would
be expected, when set for lower power levels the
bulb visibly emits a warmer color balance than
when set for half or full power. I imagine the
color balance would be decidedly warmer when used
at less than half brightness intensities, but
I didn't have a color temperature meter to check
this out.
Even Lighting
The light produced by the Superlight appears to
be very even when lighting a plain white wall
without any hot spots or edge falloff. When the
optional hexagon reflector is added, the light
pattern is noticeably altered from a broad even
light to a concentrated spot. It is truly a multipurpose
light.
One especially nice feature is the extremely
long life quartz bulb with 2000 hour expected
lifetime, so you should not be concerned about
changing the bulb for a considerable length of
time. With any quartz bulb, it is recommended
that you do not touch it with bare fingers since
they always contain oils, which can adversely
affect the glass envelope and cut down on the
normal life expectancy. You should first allow
the bulb to cool then grasp it with a cloth whenever
you must touch it.
Optional accessories include the hexagon reflector;
two sizes of square softboxes; softbox louvers;
softbox stripmasks; softbox circle masks; and
a universal connector to use the Superlight with
other brands of softboxes. Naturally, the different
wattage bulbs and bulb adapters are also available.
The reasonable price is one of its prime features.
A 1000w JTL Superlight complete with tilting stand
adapter lists for under $300.
To obtain more data on the JTL Superlight and
a catalog showing the many other studio products
available from this firm, contact JTL Corp., 14747
Artesia Blvd., La Mirada, CA 90638; (714) 670-6626;
fax: (714) 670-8836; or web site at: http://www.jtlcorp.com/.
Technical
Specifications
Power Input: 110-125v, 50/60Hz
Fits On: 3/8 and 5/8" stud
Power Cable: Removable 16'
Cooling: Blast cooling with air
Color Temperature: 3200K
Wattage: 1000w, 500w, 250w, or 150w (depending
upon model)
Fuse: 10amp, 5amp, or 3amp (depending upon
model)
Power Setting: Continuous variable with
detents
Lamp Style: Quartz-halogen, single screw
base
Lamp Life: Consistent 2000 hours
Dimensions: 51/2" diameter, 9" long
Weight: 2.2 lbs
Finish: Electrophoresis coating
Materials: Primarily nickel-lined aluminum
and steel |
|
< TR>
|
JTL Studio Flash And Accessories
Bob Shell, November, 2000
| |
| After setting things up to use the JTL
flash units with my existing softboxes
I shot a series of head and shoulders
portraits of Clarissa Murphy, a new model
I am working with. Details are in the
text. Shot on Fuji RDP III 120 in the
Mamiya 645 AF camera.
Photos © Bob Shell, 2000
|
|
Regular readers
of Shutterbug have no doubt noticed the large advertisements
from JTL Studio Systems. From the ads it looks like they
sell everything you could possibly need to equip a studio,
and if you realize that their ads show only a small fraction
of the product line in their full catalog you will be as
amazed as I was at the number of products they carry. In
fact the sheer size of their product offering made it difficult
for me to decide on just a few products to borrow from them
for this test report. I finally settled on three flash units,
enough for a basic studio setup, and a small assortment
of accessories.
Since "C" stands
are a basic piece of equipment for any studio to support
everything from flash heads to backgrounds, I was interested
in taking a look at JTL's version of this popular type of
stand. The main difference in the JTL stand and others I
have used over the years is in the rubber handgrip on the
stand column which makes it easier to carry, and in the
spring inserts which prevent the stand sections from collapsing
suddenly under weight when released. These sections go down
smoothly and softly due to the use of these springs. I found
the stand was quick and easy to set up since the legs quickly
swing into position and click into place. These would be
excellent stands for travel since they fold and unfold so
rapidly, and equally at home as more or less permanent fixtures
in the studio. The one I tested was just over 6' in height
(No. 5035) when fully extended.
|
| |
| This is one of a series of photos I
did in my studio with model Kim Franklin
using the JTL studio flash units. Details
are in the text. |
|
Also available
for the C stands is a support arm with clips, called a 5
in 1 Holder Kit by JTL, which is used to hold the JTL folding
reflectors, available in a wide variety of colors and sizes.
The flash units
I was most interested in are from the Prolite Series, which
offer digital read-outs of flash power on the side panel
and easy power adjustment via up and down buttons. The first
thing I noticed when unpacking the flash from its shipping
box is that it has a very substantial metal housing which
looks like it would take a lot of abuse. The flash is supplied
with a standard dish reflector for general use. The reflector
bayonets quickly onto the front of the flash housing and
has an integral umbrella holder. The unit I received for
testing was the Prolite L-800, the 800 ws model. I liked
the digital display side panel with its push button controls
of all functions. You can turn the audible ready signal
on and off, turn the slave sensor on and off, adjust modeling
light tracking, adjust flash output, all at the touch of
a finger. I found this flash very "user friendly" to borrow
a computer term and among the easiest to use I have worked
with.
|
|
On the JTL studio
flash units the numerical part of the model number is the
power output in watt seconds. When comparing units from
different manufacturers remember that raw watt seconds of
power is only part of the picture, and that flash tube and
reflector efficiency can be just as important. I found the
JTL flash units had plenty of power for anything I would
be likely to do in my studio.
The second series
of flash units which interested me is called the Versalite
J-700A and uses a dial to control light output rather than
the buttons and digital read-out of the Prolite Series.
One thing I particularly liked about the Versalite J-700A
that I used is that the stand mounting bracket can be attached
to a groove in the light and can be moved backward or forward
to balance the light depending on what sort of reflector
or other accessory is mounted on the front.
Also, you can
mount it on either the "top" or "bottom" of the flash to
put the controls on whichever side suits you best. This
flash also offers an audible ready signal which can be switched
off, built-in slave trigger which can also be switched off
when not needed, and variable modeling light tracking. The
Versalite flash units also come with the standard reflector
and accept umbrellas.
|
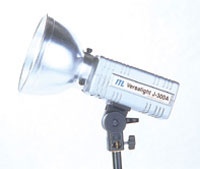
|
JTL also makes
some simpler and less expensive flash units in their Versalite
Series and they sent me one of their Versalite J-300A models
for my third light in my three light studio setup. It has
most of the features of the other JTL flash units but is
simplified with full, 1/2, and 1/4 power settings instead
of continuously variable power. It also comes with a standard
reflector and will accept umbrellas.
I used this one
as a background light for a series of high key photos with
model Kim Franklin and found it very satisfactory when fitted
with the standard reflector supplied with it.
For my first
session with the JTL lights I set up the Prolite L-800 to
camera left and set it up to shoot through a white diffusion
screen. This was my fill light. To camera right I set up
the Versalite J-700A with standard reflector as my key,
using no diffusion on this one. As mentioned, I used the
Versalite J-300A to camera right to light up my white background.
After setting my two main lights for a 2:1 lighting ratio,
key to fill, and background one stop hotter, I shot several
rolls of test film using Fuji RDP III. Exposure was determined
with my Sekonic L-508 meter in incident mode, and was set
to f/8. When I picked these test shots up from the lab I
was happy to see that everything had worked perfectly. I
then shot more film using the same setup and you see one
of the resulting photos here in this article. This testing
was done with a Canon EOS-1V fitted with the Canon IS 28-135mm
lens.
Generally, though,
I am a softbox kind of guy, so I had to see how these JTL
lights would work with softboxes. I put the Prolite into
a large Chimera softbox to camera left and the Versalite
into a smaller Photoflex softbox to camera right. Once again
I set a 2:1 light ratio for an overall exposure of f/8 at
ISO 100 and set the background light for the same, since
I did not want the background overly "hot" in these photos.
I was doing a test shoot with a new model on the day I had
this setup working, so I did a series of headshots of her
using the Mamiya 645 AF camera and the Mamiya AF ULD 210mm
f/4 IF lens. An example from this shoot is with this article.
I found the JTL
flash units very easy to work with. They all have plenty
of power and I never needed more than half power on any
of them for what I was doing. I was also pleased to find
that the light output of the three units was consistent
from flash to flash, never deviating even a tenth of a stop
in my meter reading during continuous shooting. The many
rolls of perfectly exposed slide film are the proof in this
pudding. I also found the color balance of the light matched
well among the three test flash units and seemed to be very
neutral. I did not notice any color shift in my film.
Would I use and
recommend the JTL flash units after my tests? Absolutely.
You can learn more about JTL products by visiting their
web site at: http://www.jtlcorp.com/ where
you will find a complete product listing and details as
well as dealer information. If you do not have Internet
access you can call JTL at (714) 670-6626 to find out the
name of your nearest dealer. JTL does not sell direct to
the consumer but through a network of dealers around the
country. Prices are determined by the dealer, so check with
your dealer for current prices on products that interest
you. |
|
|